
Do you want to plant a tree, but you’re not quite sure of the best way to do it? This article will teach you the best way to plant a tree.
Without good planting practices, many trees fail to establish. Many of these trees even die. The following method of planting will ensure your tree has the best start to its life.
I run the tree planting program for my city. We plant thousands of trees a year. Over the years, we have trialled many different planting methods, trying to get the best results. The method I present today is the best method we have refined.
The best time to plant a tree was 20 years ago. The second best time is now – Chinese Proverb
How to Plant a Tree: A Step-by-Step Guide
The following is an in-depth guide to planting a tree.
I learn best when I understand why I’m doing something a certain way. So, in this guide, I will present a lot of information to assist your learning.
Before Planting
Before you plant a tree, you need to consider a couple of things. These things are:
- What tree you’re planting
- The tools and equipment required
What Tree You’re Planting
Planting the right tree for the right location is essential. Proper tree identification is required to ensure your tree thrives in its new home and doesn’t cause too many problems.
I have written an article on choosing the right tree to plant. The article outlines 11 things to consider when choosing a species.
This table outlines the selection criteria.
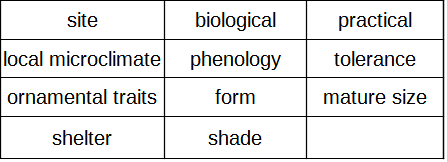
Here’s a link to the article: Choosing the Right Tree to Plant: An Extensive Guide
Make sure you buy quality stock by checking out this guide.
The Tools and Equipment Required
Here is the list of tools and equipment you need to plant a tree:
- Gloves
- Steel-Toed boots
- Shovel
- Crowbar
- Tub
- Water Well
- AG Pipe
- Stanley Knife
- Wooden Stakes
- Knocker or Mallet
- Hessian Strap
- Staple Gun with Staples
- Secateurs
In addition, you will need access to water and mulch too.
For a better look at this list, check out the following article: All the Tools and Equipment You Need to Plant a Tree. In that article, I have also included what to look for in different pieces of equipment.
Step One: Dig a Hole
You will need to dig a hole for your tree to go in. Your soil will determine how hard this job will be. If the soil is compacted, it will be much harder to dig. A crowbar can help.
First, some guidelines when digging a hole for a tree:
- Dig the hole 2-3x the width of the tree’s root ball
- Make the hole circular or square
- The hole should be no deeper than the tree’s root ball
- Soften the walls of the hole (for compacted soil)
Dig the hole 2-3x the width of the tree’s root ball
A tree’s roots need room to grow. A hole 2-3x the width of the root ball will allow the roots to establish without any constraints.
Make the hole circular or square
There have been many debates over square or circular holes. However, the width of the hole is more important than the shape.
From the book, Applied Tree Biology:
Good planting practice for amenity trees requires a circular or square hole to be cultivated 2-3 times the diameter of the root-ball, so that the tree’s root system is unconstrained in its development into the new host soil.
The hole should be no deeper than the tree’s root ball
The hole depth needs to be the same depth as the root ball. Planting the tree too deep or too shallow will cause issues.
Planting the tree too deep will bury the stem. A buried stem will be too moist and at risk of decay.
Planting the tree too shallow will expose the roots. Exposed roots will dry out and die.
When planting a tree, identify the root flare. The root flare is at the tree’s base, where the stem transitions into roots. Ensure the root flare is level with the final soil grade when filling in the hole.
Below is a great video showing you how to identify a tree’s root flare. Finding a tree’s root flair
To summarize this point:
Roots are designed to be buried, and stems are designed to be above the ground.
Soften the walls of the hole (for compacted soil)
If the soil is heavily compacted, roots may struggle to move through the soil. You can assist the roots by softening the walls of the hole.
You can soften the walls by scratching them with your shovel.
Tips for Digging a Hole
It’s hard work digging a hole; the following tips will make it easier.
- Use the correct form to prevent injuries
- Alternate between a shovel and crowbar to penetrate dense soils
- Water the hole to soften the dirt (it will become a lot messier)
- When digging, put the dirt into a tub.
- A tub will help keep your worksite clean, while also making it easier to fill the hole back in.
In summary, dig a hole no deeper than the root ball. Also, this hole needs to be 2-3x wider than the root ball. When digging, ensure you use proper form and technique to avoid injury.
For more information on the correct planting depth, check out this article: How Deep to Plant a Tree For Maximum Longevity. This article includes a deeper look at the consequences of incorrect planting depth.
Step Two: Place the Tree in the Hole
Before placing the tree in the hole, ensure the base of the hole is firm and even. A strong base will keep the tree upright as you fill the hole.
Next, carefully remove the container or wrap the tree that came in. Here, you can also lightly tease any roots circling the outside of the root ball.
Place the tree in the hole. Make sure the tree is upright and not on a lean.
Step Three: Fill the Hole (Dirt, Water, Well, AG Pipe)
For this next step, you will need access to water. Essentially, you want to alternative fill the hole with dirt and water. By letting the water soak in, the water will penetrate deeper.
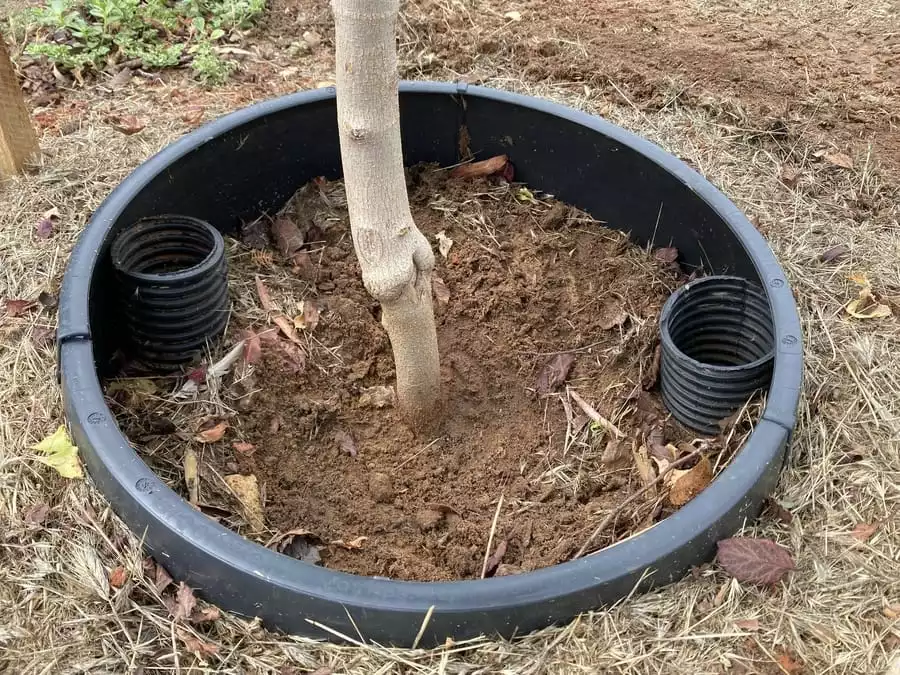
When you are filling the hole, there’s an opportunity to place the water well in too. On the side of the well, there is a faint line. This line indicates how deep you need to bury the well. The line should be in line with the ground level.
Also, there will be an opportunity to place the AG pipe in the hole.
To prepare the AG pipe, you will need a Stanley knife. Cut the piping into small parts. These parts should be approximately half a foot in length. You will need two pieces of piping for your tree.
The piping will sit inside the water well, each piece on opposite sides of the tree. The top of the pipe will need to sit just underneath the top of the well. At this height, water will spill into the piping, penetrating deep down.
To fill the hole:
- Half-fill the hole with soil
- Fill the hole with water
- Allow the water to sink into the soil
- Place the water well in the hole around the tree’s trunk
- Place the piping into the well
- Fill the hole and around the well with dirt
- Adjust the well and piping as dirt fills the hole
- Lightly compact the soil with your hands – stomping can damage the roots
- Water the tree again
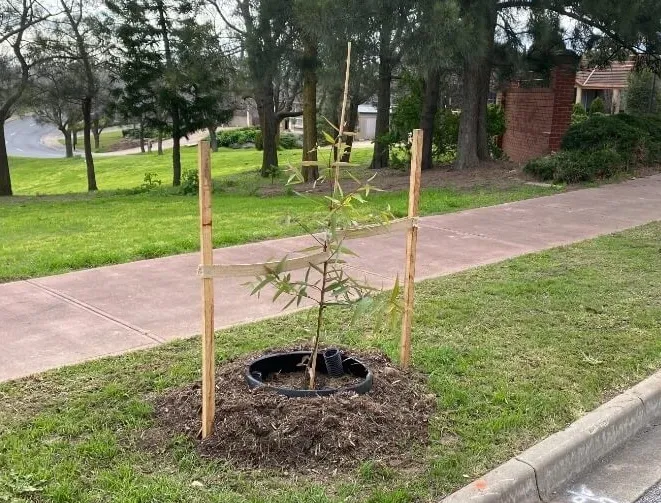
Here’s a photo of the result:
Step Four: Stake and Tie the Tree
It’s not always necessary to stake and tie a tree. Here are the three reasons why you should tie a tree:
- The tree is on a big lean
- The tree can’t support itself
- The tree is in a windy location
If your tree doesn’t fit the above criteria, you don’t need to support the tree. A tree that grows to support itself will be stronger and more stable in the long run.
From MIS313 Tree Health & Maintenance:
When a tree flexes in the wind the trunk strengthens as it grows. While staking should not be required and is not recommended, there may be situations where you may decide to stake a new tree. If staking is required, make sure the tree is tied loosely so the trunk can still flex. The two stakes and support cable should be removed after a year of growth.
If you do need to support your tree, you will need:
- wooden stakes
- knocker or mallet (to secure the stakes)
- hessian strapping
- stapler with staples
You will need to place the stakes on opposite sides of the tree. When placing stakes, ensure the stakes are outside the root zone. Nailing a stake through roots is bad for the tree.
The hessian strapping will wrap around the tree. Hessian strapping allows the trunk to grow and expand. To hold the strapping in place, you will need to staple the strapping to the stakes—one piece of strapping per stake.
When securing a tree, ensure the wrapping is in the lowest third of the tree. By wrapping the tree so low, the tree will still move and grow in the wind.
Here’s how to secure a tree:
- Place two stakes on opposite sides of the tree (outside the root zone)
- Use a knocker or mallet to hammer the stakes into the ground
- Ensure you are wrapping the tree in the lowest half of the trunk
- Loop the hessian tie loosely around the tree and back around one of the stakes
- Staple the strapping to the stake. Cut off the strapping
- Repeat this process for the other stake
Step Five: Prune the Tree
Formative pruning is not necessary for new trees. Wait at least one year until giving your tree a formative prune.
However, you may remove broken or rubbing branches. You can remove these branches by using a pair of secateurs.
Ensure you prune correctly, following the best arboricultural practices.
Step Six: Mulch and Water Your Tree
Mulching your new tree is beneficial for the following reasons:
- Keeps moisture in the soil
- Moderates the temperature of the soil
- Nourishes the soil
- Reduces weeds
- Can protect the tree from compaction damage
Using organic mulch, cover the area surrounding the tree. Cover an area at least double the width of the root ball. Fill the mulch to an approximate depth of 5 inches.
When filling with mulch, don’t allow mulch to touch the tree’s trunk. Mulch resting on the trunk can cause issues.
Once the mulch is in, you can fill the well up with water again. From here, water your tree once a week for the next one to two years. In hotter months, watering twice a week will help.
CONGRATULATIONS! You have just planted a tree